
\\ GPS + Phone Dash Mount (Update) \\
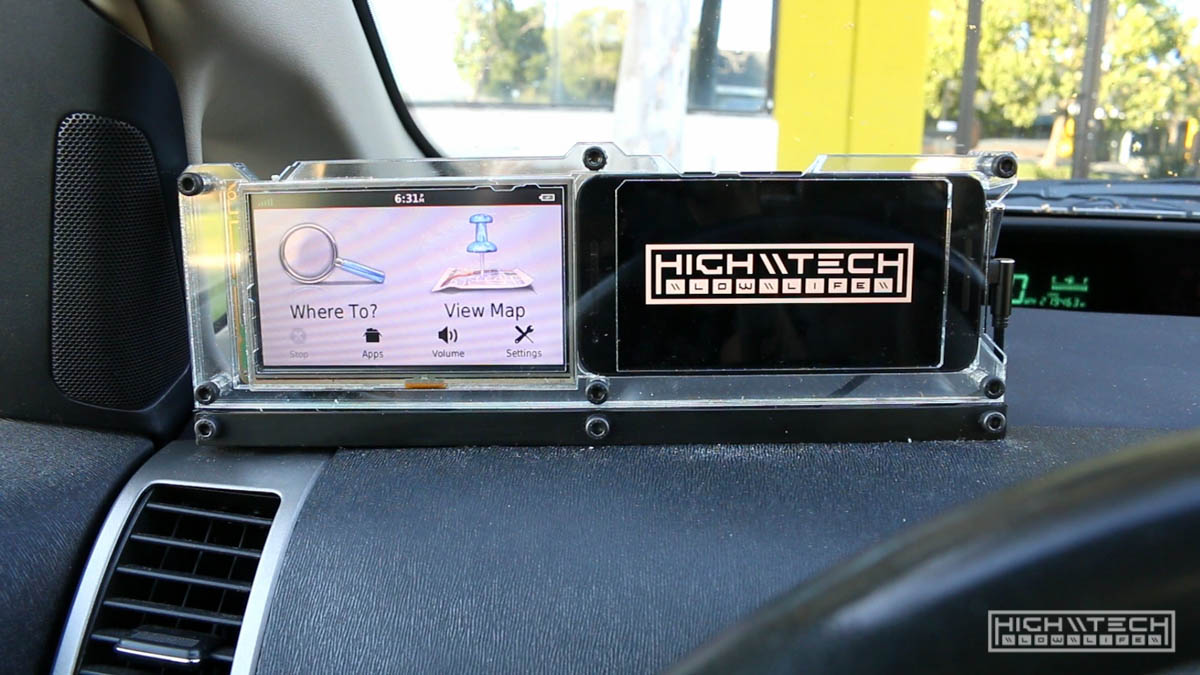
Way back in 2016 I wanted to create a custom mount for a GPS and Android phone/media device for my 2006 Toyota Prius. So I did it.
It worked very well, and over the years the only issues I’ve encountered have to do with the phone I chose as my media player, a Motorola Moto G (1st Gen). I bought this back in 2014 for $90 and it was a great phone that I used as my daily driver but over the years it became worse for wear, on one camping trip it took an unexpected spa bath in orange juice and after a thorough drying it worked perfectly again. I had upgraded to a Galaxy Note 4 after that which was a huge upgrade so I delegated the G to a carputer/media hub. I know most people just use their current phones to play music in their cars and I get that, but I just like having a dedicated source that is with the car, plus it allows me to install another screen and more tech in my car and why would I pass up that opportunity?
This isn’t a write up for the full build of the “car” portion of it since I did that a long time ago and I didn’t record a lot of it, but the gist of it is;
- Make acrylic mount (…more on this later)
- Mount said acrylic mount on the dashboard using aluminum L channel and bolting it to the dash
- Run 3 wires under the dash, power for GPS, power for phone, audio for car
My original plan was to wire a 3.5mm aux cable from the phone to the aux input located in the center console, so I managed to snake the wire under the carpet and the finished product looks very clean. This was awesome until I realized that the audio jack on the phone was “compromised” and of course I didn’t test it before going through all this trouble because that would just be too logical. You could still hear sound through the jack, but it was either alternating left/right or cutting off one channel entirely. I thought it might be the cable, but I tried it with a different cable and no dice. So the port was dying, or dead.
Thankfully this phone also has bluetooth, so I bought a very cheap ($9) A2DP/3.5mm bluetooth to aux receiver adapter, which on the prius is very cool because they handily put a cigarette lighter 12V outlet right next to the aux input jack which is inside the center console. The bluetooth connection worked very well for almost 3 years now, but I started getting more and more errors of “bluetooth service has stopped” and I knew it was failing because they were becoming more and more frequent to where I had to play a game of “unplug things at random until it all works by finding the random sequence” just about every time I drove my this car which became more and more annoying.
I did also have to replace the battery in this phone after about 2 years of it being in the car, as it had become bubbled up and wouldn’t hold a charge anymore - the replacement battery was very very cheap and it didn’t last very long (much surprise). The combination of being in the sun and not being able to discharge much isn’t easy on the batteries. My last drive to work in this car the phone wouldn’t turn on at all, despite being plugged in and was claiming 0%, even after charging the whole way there. I did sit in silence the whole trip to work to really motivate me to upgrade, it was time.
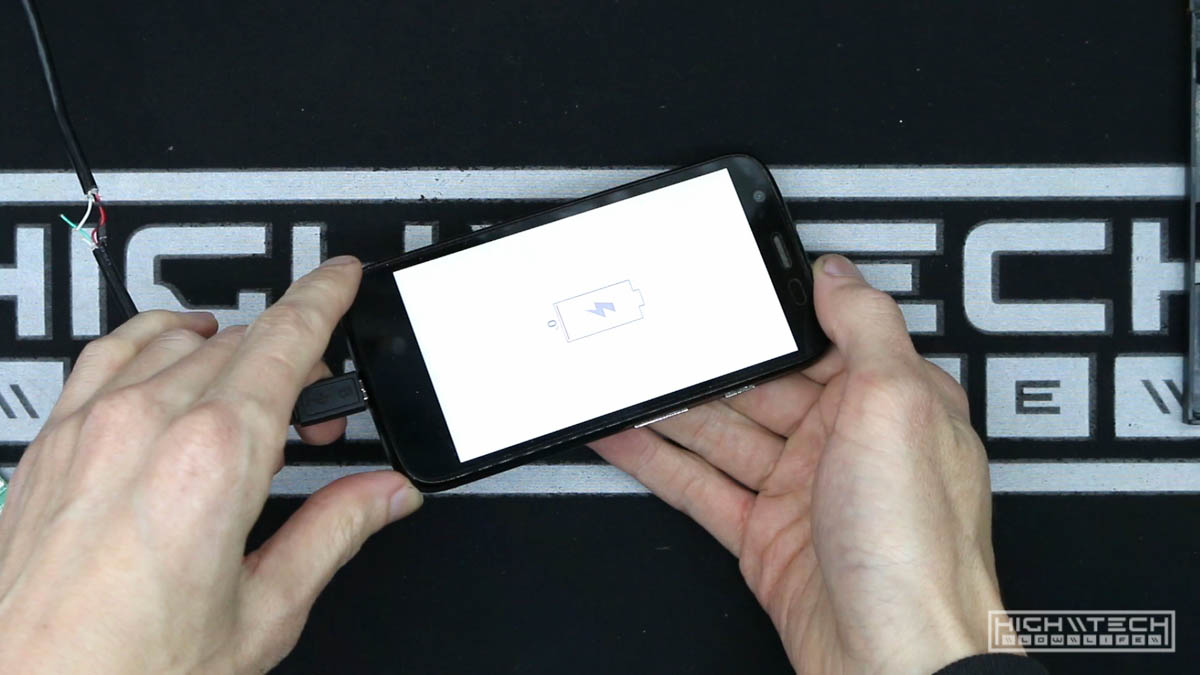
To recap, the phone is dead. Audio jack failure, bluetooth failure, now battery failure. I’m sure with a new battery it could live again, but it’s time to retire the faithful G, it has truly impressed me.
\\ Now I need a new phone. \\
I did a lot of hacking to the G to make it a good candidate for car use. I hacked the charge input screen to trick the phone to turn on when it was plugged in, I also hacked it so it would increase the volume after startup (because google wants to save your ears, but I’m not using headphones, I’m attenuating volume downstream! Plus they’re my ears anyway, if I want to be stupid and blow them out that should be my decision, not google’s. Warning once, ok… default to new volume after every reboot? No. /rant). For both these hacks you need root access and more modern phones are making rooting harder, or blocking it entirely.
So the new replacement phone must;
- Be rootable
- Have a (working) headphone jack
- Have bluetooth (as a backup)
- Preferable to have external SD storage
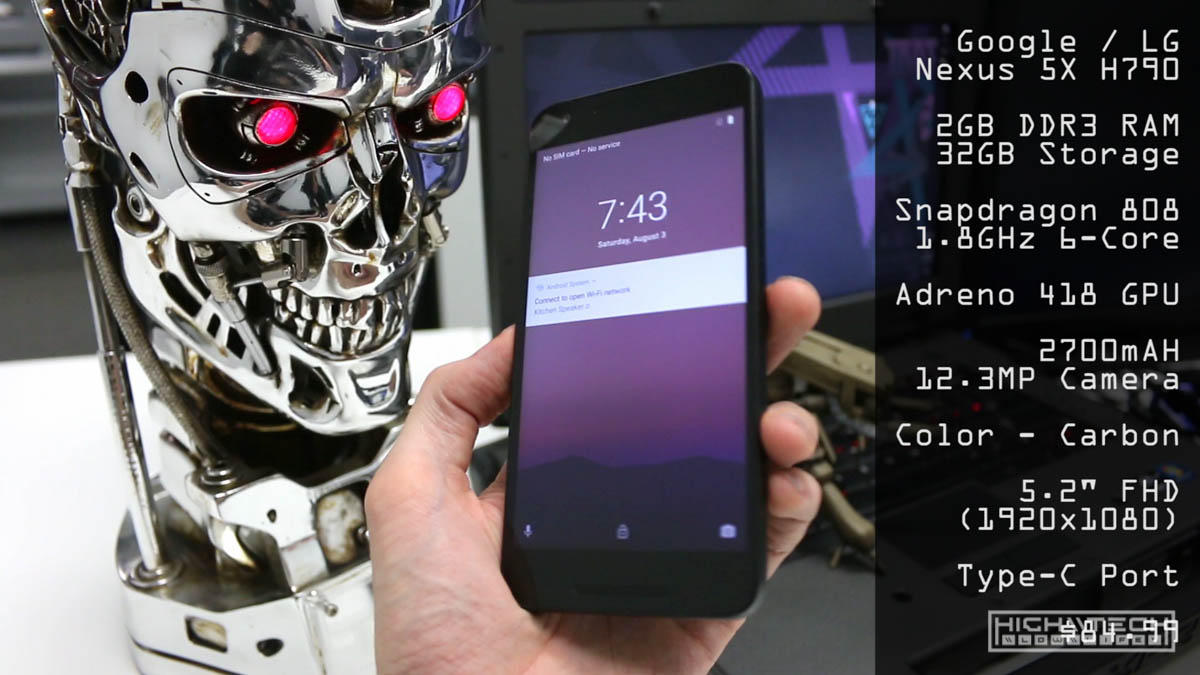
After looking at a lot of older (cheaper…) phones I decided upon the Nexus 5X which I got on eBay for $84. They had some cheaper ones I found for around $34 but that seller seemed extra shady and you know what they say about things that are too good to be true. I have a lot of Nexus 7 tablets (like a lot of them…) because they are cheap and awesome. The Nexus line is known for being root friendly with unlockable bootloaders, it does have a headphone jack, and bluetooth (hard to find a phone without BT though), the only thing I wish it had was an external SD card slot, but 32gb is plenty for some mp3s. So ok, 3 outta 4 ain’t bad.
\\ Rooting the Nexus 5X 8.1\\
Now, it’s been 3 years or so since I’ve rooted a phone, so I had to give myself a refresher. After some bumbling around and realizing things weren’t working, I did end up figuring it out.
First off, do not. DO NOT use “dr.fone” to root. My experience was total garbage. I remembered from when I rooted last the interface I was used to was very verbose which I liked, with a live log and this was not like that at all. Their “app” did nothing essentially, and it took a really really long time to do nothing. I figured any of the “top 10 rooting apps” would work fine, but no, no no no. This app took 2.5 hours (HOURS) to essentially say “hey, we can’t root your device”. Really? I remember rooting in 5-10 minutes previously, not hours. Anyway, save yourself a lot of time by not using this app at all.
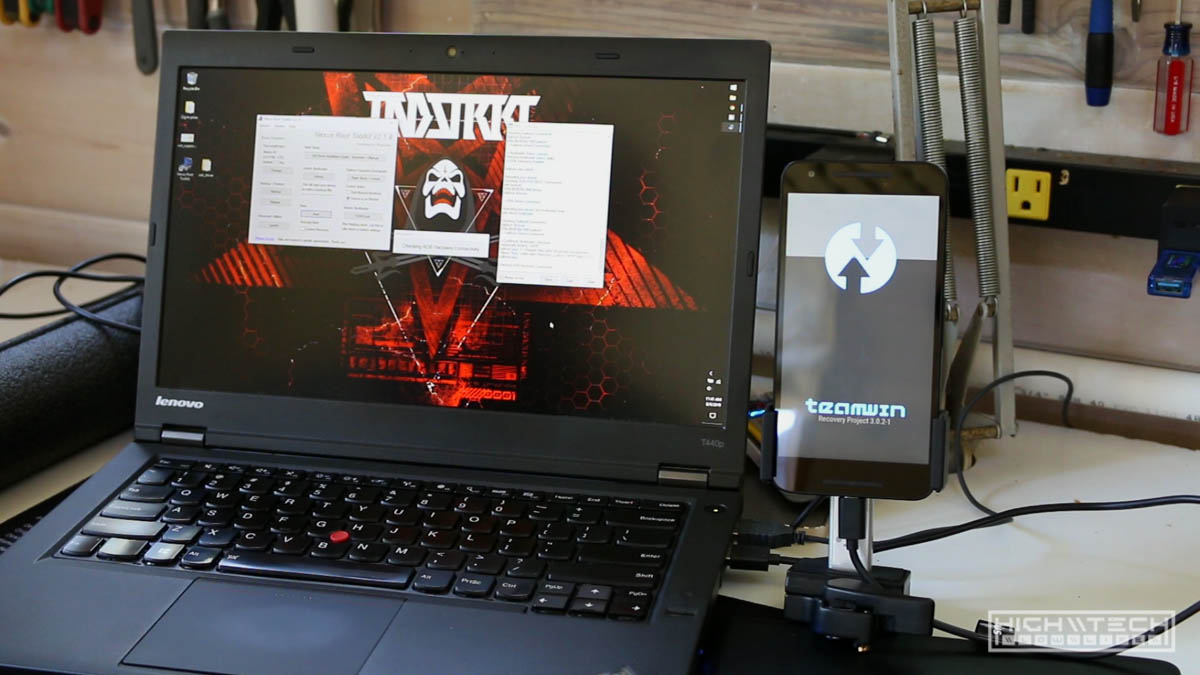
After scratching my head a bit and trying to remember the name of the app I used to use, I finally found it. Nexus Root Toolkit by WugFresh. This app does a lot of things and lets you know what is happening while it’s doing them. After installing it will ask you which device you have and which version of Android you’re running. My phone came loaded with 8.1, which the app didn’t have listed, so I clicked the “auto detect” and it was able to find one for me. If it doesn’t have the right image or can’t download it automatically, just follow the instructions and download it manually, then point the app to where you downloaded the image, pretty simple.
My first snag was the fact that the toolkit couldn’t communicate while in recovery mode, but the app will let you know why you’re having issues and it said to install the USB drivers. So if you do that first you’ll be better off; Google USB drivers
Don’t forget that you have to enable USB debugging on your phone by “becoming a developer” first. Just go to settings > system > about phone, then click 10 times on the “build number”. Now you’re a developer. Now go into developer options and turn on USB debugging.
Now use the Nexus Root Toolkit to unlock the bootloader, pretty easy, just follow along the steps within the app. Only takes a minute or two to complete. It will wipe your device, so backup anything you want to keep, and remember you’ll have to reanable USB debugging again after you unlock the bootloader so you can root.
Actually rooting, finally… I hit another snag while trying to root with the Nexus Root ToolKit, I’m thinking it’s because the image is too new (8.1), but after rooting and the app saying that everything was completed successfully and that I had root, I couldn’t run SuperSU and it said that I needed root to run, so something was wrong. I did notice that TWRP was working temporarily for the attempts the app was making when trying to root. I found a specific tutorial on how to root a Nexus 5X running 8.1 and it suggested to use Magisk Root. Just download the zip to your desktop, then copy the zip to your root folder on your phone.
You need TWRP installed in our recovery partition to install the zip on the phone, so use Nexus Root Toolkit, and launch “Advanced Utilities” from here you can install TWRP to your recovery partition, I just told it to download and install the latest TWRP release.
After that completes, boot into recovery (hold vol down and press power button to boot to bootloader) navigate to recovery by using vol up or down, press power once you have recovery selected. From there click “install” then navigate to the Magisk Root .zip file you copied earlier. Once that finishes, reboot and check if you have root (which you will). Hooray!
\\ Power on when plugged in \\
Because I don’t want to have to press the power button on the phone each time I get in the car like some sort of plebeian (because DUH I want to listen to music in the car every time I drive!) so we need to get the phone to do this when it receives power from the 12V cigarette lighter port. I have done this on Nexus 7s no problem, and even on the Moto G, and I think it should be a similar procedure for the 5X if even possible at all. We’ll find out.
Took me a bit of searching but thanks to stack exchange and Dan’s blog, on stack exchange someone mentioned it working on a Pixel 2 XL which is made by LG so I figured it would also work on the Nexus 5X. This guy’s page helped too; although he typed the command wrong (missing a “-“ after mode… so that part wasn’t very helpful.)
Using the Nexus Root Toolkit, go back to “Advanced Utilities” and this time we’re going to use “Manual Input” Launch Command Prompt.
You need to be in the bootloader to write files, so while you’re in the CMD prompt type;
adb reboot bootloader Wait for your device to boot into the bootloader, after it does now type;
fastboot oem off-mode-charge 0 (and if you ever want to restore the ability to NOT have your device turn on when plugged in; fastboot oem off-mode-charge 1)
Now reboot your phone and check if you can boot it by simply plugging it in to charge. Success!
\\ Automation \\
Just because the phone will boot on its own now, doesn’t mean it will do anything else. For that we can install MacroDroid from the google play store. This app is really cool, you can automate just about anything with it, with even more extra features if you have root. It’s also very easy to use, which some of these automation apps are not.
First turn off your screen lock. I was wondering why my macros weren’t starting and I guess they need to get past that first.
We’re going to create a macro that opens google music and plays automatically after booting.
We’re going to be using 2 triggers, because sometimes you won’t want the phone to turn off, say for example you’re just getting out for a little bit, or getting gas, etc. Also it’s good for the battery to let it drain for a while sometimes instead of it only every being charged.
Macro 1 (booting / launch)
Triggers:
- Device Events > Device Boot
- Device Events > Power Connected (all sub options, slow / fast / wireless, etc..)
Actions:
- Device Settings > Battery Saver > Off (You can omit this if you’re shutting down every time)
- Applications > Launch Application > Google Play Music (No sub options selected)
- MacroDroid Specific > Wait Before Next Action > 5 seconds
*(sometimes with automation things can happen to quickly and you'll want to add some pauses between actions so that they can execute correctly, you can play around with the timing to have things go faster)*
- Media > Control Media > Simulate Media Button > Play/Pause
\\ Extra - auto click the bottom left of the play app to bring up a larger thumbnail so you can easily swipe to skip tracks \\ - For this you’ll have to enable experimental features in MacroDroid settings. MacroDroid will prompt you to enable more permissions in your system settings to allow UI interfacing for the app before it will work.
- MacroDroid Specific > Wait Before Next Action > 5 seconds
- Device Actions > UI Interaction > Click > Identify in app (open the app, click the notification, then click the area you want it to automatically press)
Macro 2 (shutdown / closing)
Now that we have a nice macro that does things when we first turn the car on, we need one for when we turn the car off.
Triggers:
- Device Events > Power Disconnected
Actions:
- Media > Control Media > Simulate Media Button > Pause
- MacroDroid Specific > Wait Before Next Action > 5 seconds
- Device Settings > Battery Saver > On (You can replace this with shutdown if you wish)
That’s about it for the shutdown macro. I have the wait command in the shutdown macro because the GPS has an automatic 15sec timer when it loses power and I just like to have both devices turn off at the same time, but you can omit the wait command if you like.
I’m trying out the battery saver function as the majority of the time I will just have the device save power while still being on, this will make the times you get in the car you don’t have to wait for the device to boot, plus it should be easier on the battery, and in the event it does run down to where it shuts down, it will just boot again automatically when it gets power. If I know I won’t be driving the car for a couple of days I’ll just manually shut it down (if I remember to) and if I don’t, it’s no big deal. If I want the phone to always turn off when I turn the ignition off I can just change that line in the shutdown macro.
*I tested this and the only issue I had was that by combining my "boot" and "power connected" macro 1 was causing a conflict because the UI element action was now "closing" my play screen to where it was toggling, and I didn't want that. Simple fix was creating a 3rd macro (state) in which when power is reconnected (but not booting) that I remove this UI element action.*
So my final macro arrangement is;
Macro 1 (booting)
Triggers:
- Device Events > Device Boot
Actions:
- Applications > Launch Application > Google Play Music (No sub options selected)
- MacroDroid Specific > Wait Before Next Action > 5 seconds
- Media > Control Media > Simulate Media Button > Play/Pause
- MacroDroid Specific > Wait Before Next Action > 5 seconds
- Device Actions > UI Interaction > Click > Identify in app
Macro 2 (returning power)
Triggers:
- Device Events > Power Connected
Actions:
- Device Settings > Battery Saver > Off
- Applications > Launch Application > Google Play Music (No sub options selected)
- MacroDroid Specific > Wait Before Next Action > 5 seconds
- Media > Control Media > Simulate Media Button > Play/Pause
Macro 3 (shutdown / closing)
Triggers:
- Device Events > Power Disconnected
Actions:
- Media > Control Media > Simulate Media Button > Pause
- MacroDroid Specific > Wait Before Next Action > 10 seconds
- Device Settings > Battery Saver > On
You may be able to do this with a constraint for the first macro, but it was easier for me just to create a 3rd macro by cloning the 1st boot macro and editing it.
\\ Custom boot screen \\
This one is just for funsies. I remember thinking I was the coolest - most elite hacker when I changed the boot screen on my window XP installs, some things never change.
This video tutorial helped a lot, and also some official google reference here. Thanks guys.
I’m not making an animation because I’m happy with just simple images as my boot screen, so this is a bit more simplified than what it could be (you can even add sound?). I just want my thing on the thing to make it a cooler more personalized thing.
SO…
First you need to make the images, my Nexus 5X has a 1920 x 1080 resolution screen, so you guessed it, fire up your favorite photo editor open a new file that is 1920 x 1080 pixels. Now make 3 cool images, one for the “intro” of the boot screen, one for the middle which stays looping while the phone actually boots, then one for the “outro” for when the phone is booted and you can have an animation (or image) to lead out of the boot screen.
\\ The images must be saved as .png. \\
Now you need to make the folder structure for the boot screen;
- You need to make a folder on your desktop, name it comp1
- Inside that comp1 folder you will make 3 other folders; part0, part1 and part2
- Also inside your comp1 folder you will make a text file named desc.txt
- In that text file desc.txt you will write this;
1080 1920 30
c 1 30 part0
c 0 0 part1
c 1 90 part2
You can reference the google link to know what all the c’s and numbers do, but I’ll break it down to the essentials.
First row is resolution, it’s width by height if you’re holding in portrait mode, so that’s why it’s 1080 (width) by 1920 (height), the next number 30 is for the framerate (in seconds) of the animation. I think I could leave this as 1 since it’s just a single image with no animation (like 1 frame per second), but I didn’t play around with that.
Next row is c, which basically says “play this animation until it is done, even if the phone is booted already”, you can change this to a p if you want the phone to immediately take you to the home screen regardless if the animation is finished or not. Now, the 1 is for how many times you want this sequence to run, 1 is one time for 0 is infinite, more numbers are more times, the 30 is how many frames you want the last frame of your animation (in this sequence) to pause. Lastly the part0 references the folder structure, “play the images in folder one for this sequence”.
part0 is for the intro sequence part1 is for the looping part sequence part2 is for the outro sequence
Seems complicated I know.
So basically, my desc.txt file is saying; “I have a 1080 x 1920 screen, I want you to play these images at 30 frames per second, all the animation images for sequence 1, the intro, are located in folder part0, I want you to play this sequence 1 time, but then pause on the last frame for 30 frames (1 second), now once that is done, go into folder part1 and grab those images and loop them indefinitely until you’re done booting, once you’re done booting, go into folder part2 play those images 1 time but hold the last frame for 90 frames (3 seconds)”
I made my images clockwise 90 degrees because when mounted the screen will be in landscape mode.
Now you have a folder that has 3 folders and a text file in it, you need winrar to save these as a zip file. Set the archive format as zip and It’s very important that you set the compression method as “store” or your bootscreen will not work. Add the files and then save it as bootanimation.zip it must be named this.
Put this zip file you created on your phones storage, I just dropped mine on the root folder, but anywhere is ok. Disconnect the phone from your computer, then using a root explorer app (I installed File Explorer Root Browser) you want to copy your bootanimation.zip file and paste it in your root folder, under System, then Media.
\ > System > Media > bootanimation.zip
You’ll find your existing bootanimation.zip file there, you’ll want to rename this something like “bootanimation2.zip” or something so you don’t overwrite your existing one, just in case you want to go back. Now paste your bootanimation.zip file here. It’s very important that after you paste your file, you have to change the permissions of the file. Select the file, then go to properties, change the settings to;
Owner: read / write Group: read / write Others: read
-rw-rw-r- -
Now reboot your phone and check out your awesome boot screen!
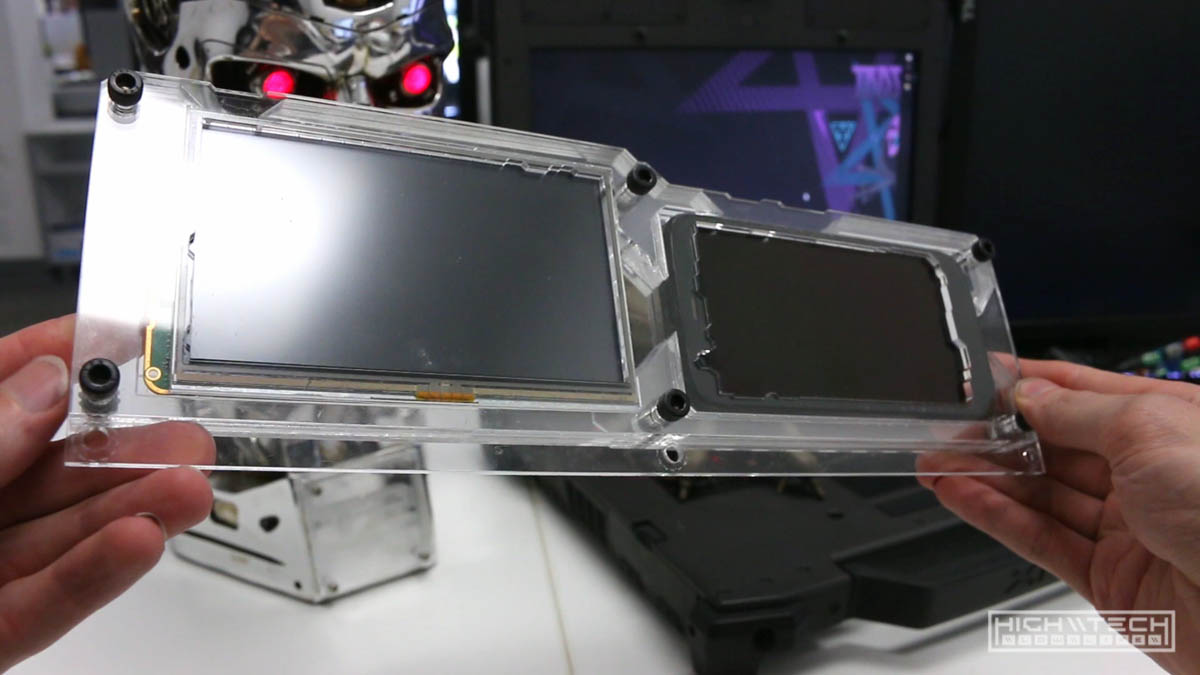
\\ Acrylic redesign \\
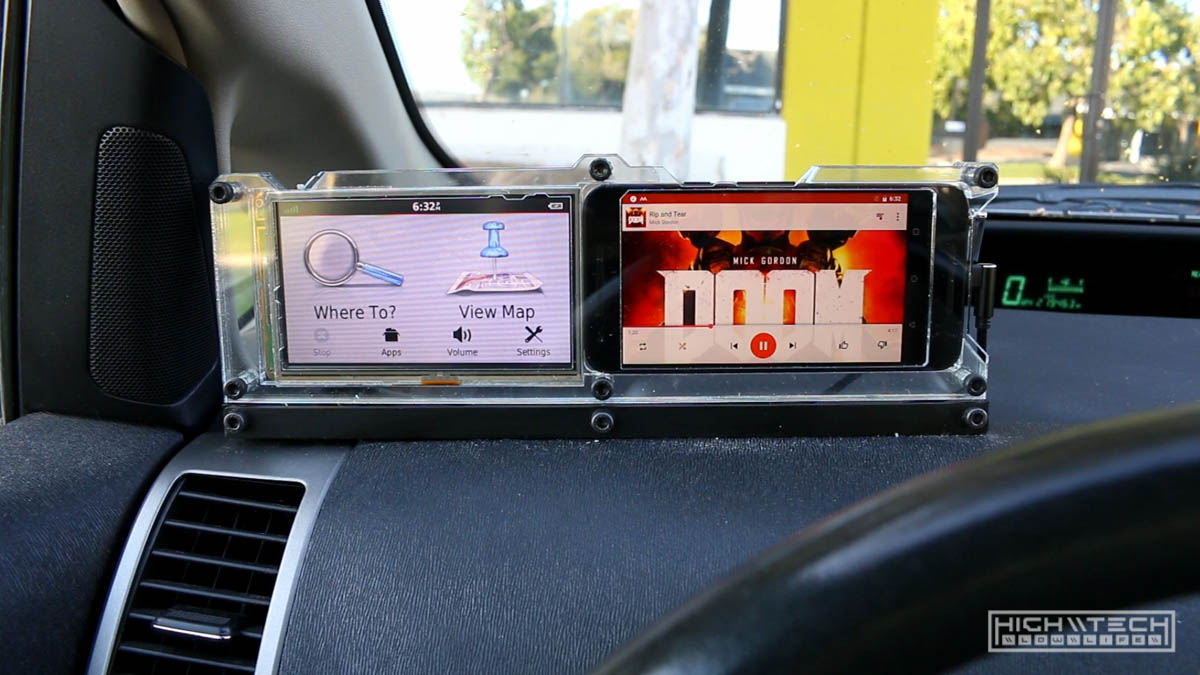
The Nexus 5X is a bit bigger than the Moto G and dimensionally different so unfortunately it won’t just drop in to the space I had made for the Moto, also the headphone jack is on the other end of the phone, this is another reason why I went with the Nexus 5X instead of the Nexus 6 because it has both the headphone jack and USB port on the same end so I could bring the phone closer to the GPS.
BTW the GPS is a “Garmin Nuvi 57LMT 5-Inch GPS Navigator”. …just in case you were wondering.
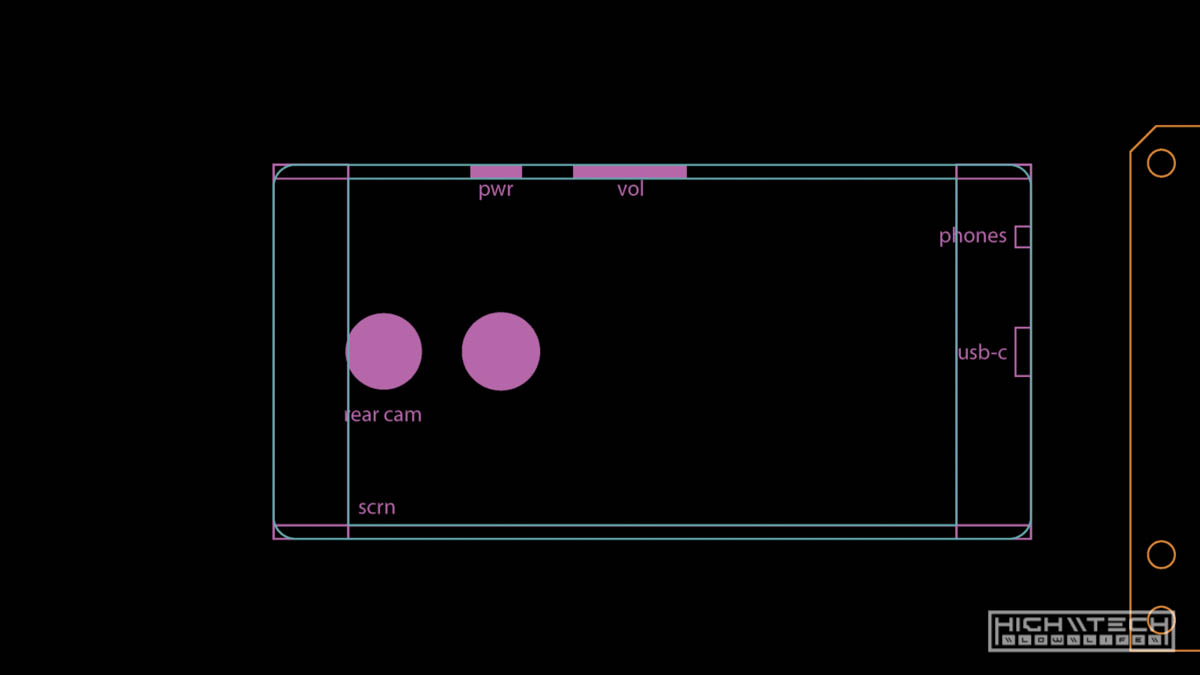
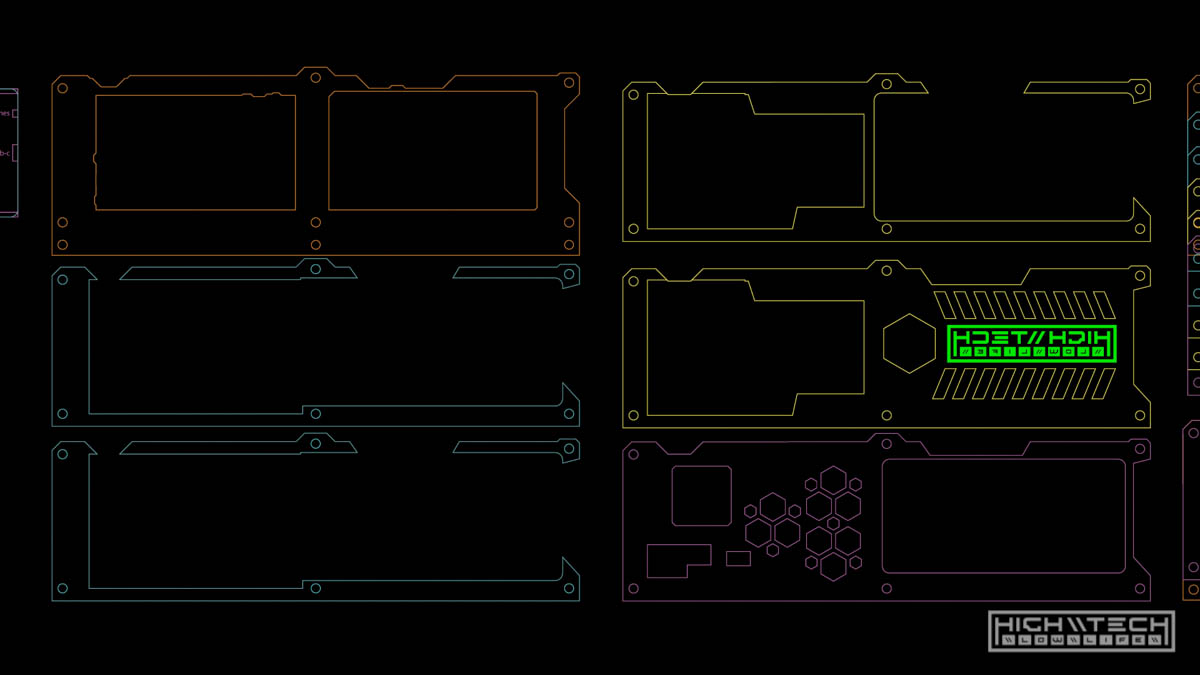
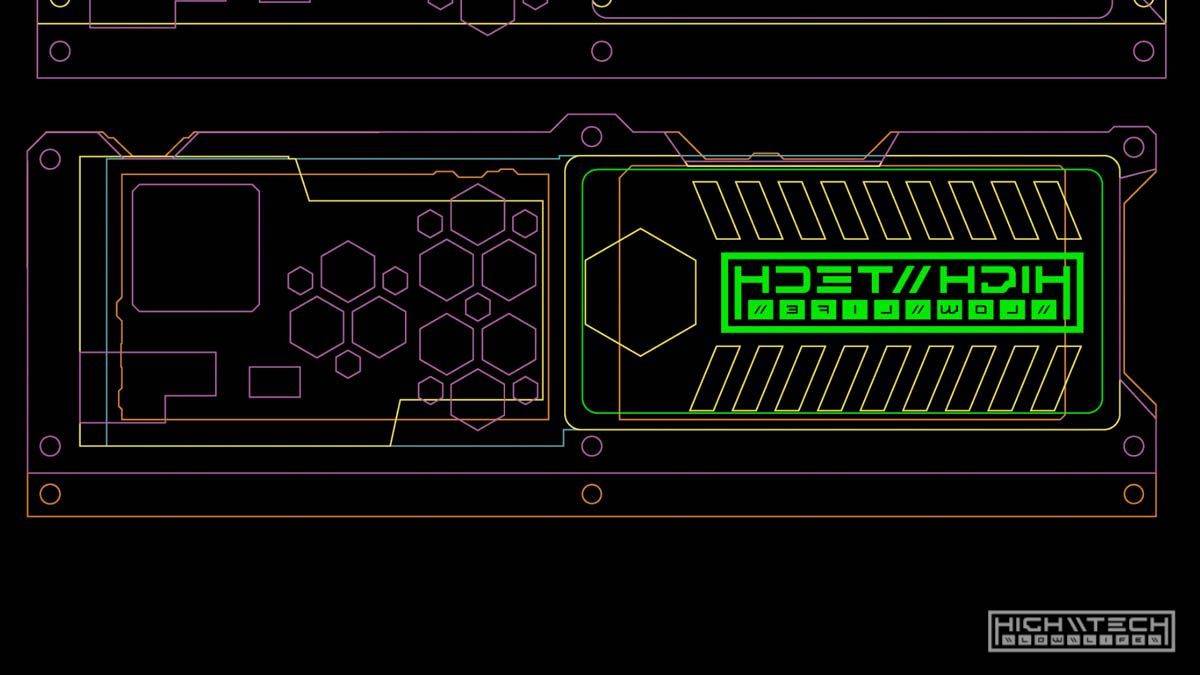
Thankfully I could reuse the GPS half of my original design because I made that much more complicated than it needed to be (always take the hard road kids!) so all I needed to focus on was the phone portion. A lot of measuring with a micrometer and plotting shapes in illustrator led me to the design I have now. This was a bit challenging as it’s a lot easier to create a mount for a single device than it is for two because you need the layers to play nice with each other, and when you have two devices that aren’t dimensionally the same it can be difficult to hold all of the layers in your brain and anticipate how they relate to both sides, I color code the layers in illustrator to make it easier to keep track, and again it’s just more confusing once you start introducing different thicknesses of layers and keeping track of how they stack. It’s not entirely difficult in any way, it just leads to a lot of room for user error (the best kind of error).
Even when you’re measuring as precise as you can, you (or I…) will eventually run into things that didn’t quite pan out as you thought they were in digital space (this eerily translates to life in general too), because of this you’ll usually have to make revisions and cut again after measuring how far you’re off. I only had to fix a few things, which is a win in my book.
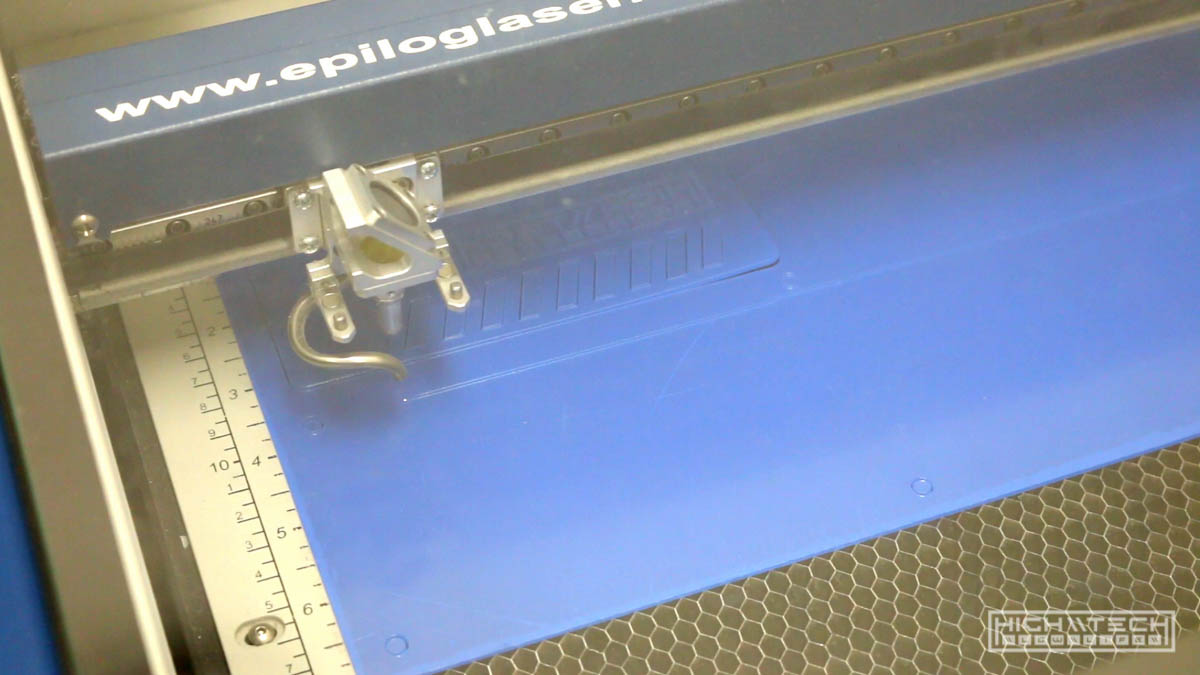
One mistake was raster engraving with the backing material still on the acrylic which came out… less than desired. I had never done it before so I gave it a shot, from now on I will be engraving with the acrylic exposed as it comes out much better. It’s ok though because this part needed to be redone anyway, turns out my hexagon hole for the rear camera wasn’t quite big enough. However - cutting with the backing material is a win though, most of the time my cuts will have marks where the laser backscattered off of the hex mesh “floor” of the laser bed but the backing material on the acrylic prevents this from happening.
Another fix was the front camera hole, I realized that it was about 2 or 3mm off center and that bothered me. I attempted to elongate the hex hole by recutting the same part but the origin is never zero again so I will recut the entire first layer again this time not cutting any hole for the camera because, I’m not going to use the camera at all, and the acrylic is clear so you should be able to use it anyway.
My last tweaks were to the front layer and back layer, I realized I could allocate more room for the right-angle type-c cable I purchased for a cleaner look, it will fit as-is but it’s a bit cramped and I was going to redo the front layer to fix the camera hole already. I am also lowering the maker cutouts for where the power and volume are on both the GPS (power only) and phone, this will make it even easier to press them without a bigger “wall” in front of them. Same edits to the back layer, just giving more room to the headphone jack and USB port, and more room to access the physical buttons.
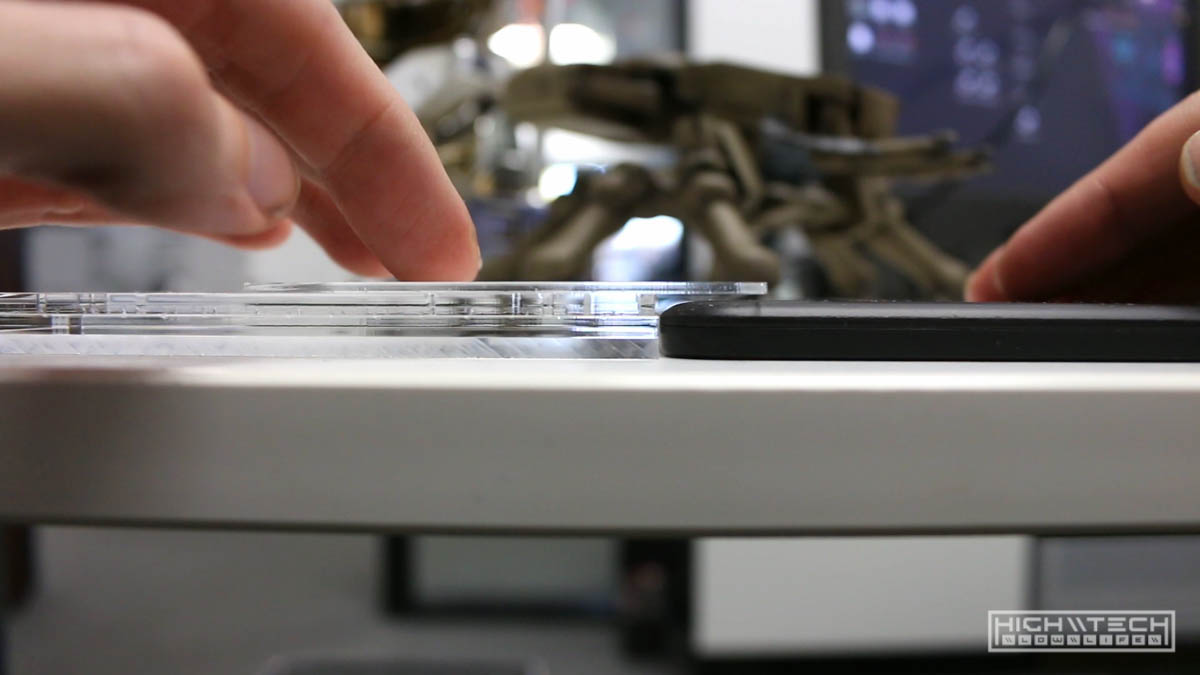
After all that cutting, you simply unwrap all of your parts, find the right orientation and then start stacking until you build your enclosure around the devices. I used 5mm hex bolts to hold everything together which is complete overkill for holding some plastic together, but I think hardware looks cool and I already had the screws and nuts.

This mount design would have been a lot easier if I could make it wider and I would have just created two separate mounts with a common 1st/front layer connecting them seamlessly, I’m quite cramped with where I mounted the metal L bracket initially with the smaller phone in there, so I don’t have much (any?) room both in height and if I go any wider I’m going to start occluding the instrument cluster on the dash, so this was more challenging than it needed to be, but it was fun to make.
This mod may last me until I sell this car, I keep thinking I “should” be driving something cooler for my daily driver, but 52mpg and a (very cheap) reliable comfy ride is pretty darn cool.
2020 update - Unforunately I had to sell the car due to the catalytic converter being stolen, I didn’t sell the car with this mount so I still have the Nexus and GPS that I need to install in something else now.